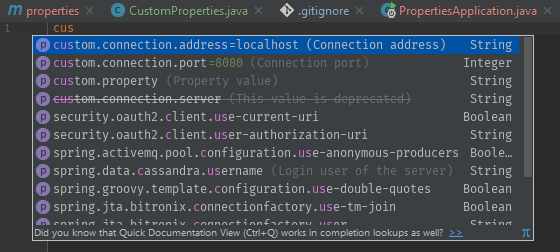
 Gdy potrzebujemy zrobić jakąś funkcjonalność opcjonalną lub nie chcemy hardkodować danych w aplikacji powinniśmy użyć własny plików properties. Spring Boot dostarcza bardzo sprytny mechanizm do obsługi nowy properties wraz z podpowiedziami.
Zaczynamy standardowo, jednakże nie jest to pozycja obowiązkowa. Jeśli chcemy mieć podpowiedzi do naszych properties musimy dodać zależność:
Tworzymy sobie zwykłą klasę POJO, która jest odwzorowaniem naszych properties. Każde pole musi posiadać gettery/settery. Klasa musi posiadać adnotację @ConfigurationProperties. Wartość prefix ustawia prefix dla naszych properties. Teraz nasze wpisy poprzedzamy słowem custom.
@ConfigurationProperties(prefix=”custom”)
@Validated
public class CustomProperties {
/\*\* Property value. \*/
private String property;

/\*\* Connection propeties. \*/
private Connection connection;

public String getProperty() {
    return property;
}

public void setProperty(String property) {
    this.property = property;
}

public Connection getConnection() {
    return connection;
}

public void setConnection(Connection connection) {
    this.connection = connection;
}

public static class Connection {

    /\*\* Connection port. \*/
    private int port = 8080;
    /\*\* Connection address. \*/
    private String address = "localhost";
    /\*\* This value is deprecated. \*/
    private String server;

    @DeprecatedConfigurationProperty(replacement = "custom.connection.address")
    @Deprecated
    public String getServer() {
        return getAddress();
    }

    @Deprecated
    public void setServer(String server){
        setAddress(server);
    }

    public int getPort() {
        return port;
    }

    public void setPort(int port) {
        this.port = port;
    }

    public String getAddress() {
        return address;
    }

    public void setAddress(String address) {
        this.address = address;
    }
}
}
W JavaDockach dodajemy opis naszej właściwości (w przykładzie “/** Connection port. */), natomiast aby dodać wartość domyślną wystarczy ustawić to pole (w przykładzie port = 8080).
Teraz możemy w prosty sposób używać naszych properties:
custom.property- pola w klasie,custom.connection.port- pola dla obiektów zagnieżdżonych.
Adnotacja @Validated dodaje walidacje do naszych properties. Wykorzystujemy do tego hibernetowe constrainty:
Po dodaniu @NotEmpty na polu property dostajemy błąd. Nie można uruchomić aplikacji, ponieważ ta wartość jest nieustawiona. Możemy w ten sposób wymusić na użytkowniku ustawienie zdefiniowanych przez nas propertiesów.
***************************
APPLICATION FAILED TO START
***************************
Description:
Binding to target pl.codecouple.properties.custom.CustomProperties@1b410b60 failed:
Property: custom.property
Value: null
Reason: may not be empty
Action:
Update your application’s configuration
Całość jak zawsze na GITHUBIE.
